Pages

25 March 2012

Swatch Book - One

So, you want a reference book written just for you?  A place to go when you can't remember a technique you learned awhile back?


Look no further, you've found what you've dreamt about, the perfect reference book just for you and the best part is... You will make it yourself!  That's right, I'm going to take you through the process of making your very own customized Swatch Book a tool you'll use for a lifetime and maybe some day hand down to a future sewing enthusiast.


We'll begin with basic seams, pressing and seam finishing.  You're more advanced?  No worries, I'll be moving forward pretty quickly, so you'll find fun new techniques before you can say 'cartridge pleats'.  In the meantime, follow along so you'll have a complete Swatch Book.


PLAIN SEAM
Place two fabric pieces Right Sides Together (right sides kissing), Sew a 5/8" Seam.
Repeat 4 more times, so that you now have 4 Plain Seam Swatches.


There are two ways to treat a seam with pressing; Open and to One Side.  Using two of your 4 Plain Seam Swatches, press one Open and the other to One Side.  When pressing a seam you must press the fabric taut against the Seam Line (stitching).


SEAM FINISH
The seams need to be treated to prevent raveling of the raw edges.  There are many ways to finish seams, we'll explore them all eventually, right now let's focus on the most basic - using a zig zag stitch.  I've chosen the Multi-step Zig Zag on my machine, yours may look a bit different, but will do the same job equally as well.
Place the Zig Zag closer to the seam if you'd like to or need to trim the seams.  Trim the seam close to the Zig Zag.  Place it at the edge when there's no need to trim.  


LABEL
When finished with your swatches label them with a fine tipped permanent marker right on the fabric or attach a written or printed label by sewing, stapling, taping or whatever means suits you.  Attach the swatch to Card Stock and keep in a three ring binder.

Now, sit back and Admire your Handiwork.

Next up:  The French Seam.


01 March 2012

Adventures in Machine Maintenance

Machine Maintenance, perhaps not the most alluring topic, but it can be adventurous.  Who doesn't love using tools?  Even innocuous tools like screw drivers are fun to use, then there's taking things apart and putting them back together, woo hoo!  
Adventure aside, taking care of your machine ensures that your machine is up to the task when needed, that you get the best results possible and extends the life of your hardworking sewing companion.
Below you'll find the disassembly of a machine of each bobbin style; front loading (oscillating) and drop in bobbin (rotary).  Each machine is different, so you'll need to consult your manual and local repair professional for the specifics of your machine.  
I consulted Harlin of Frank's Vacuum & Sewing in Montrose CA.  franksvacuumsewing.com

Here's what Harlin had to say about at home machine maintenance.
R:  How often should the machine owner perform basic cleaning?
H:  Every 72 working hours, or as needed after particularly fuzzy/linty fabrics.
R:  Is there anything that should never be done by the machine owner?
H:  Never use cooking oil as a lubricant; don't loosen or tighten screws indiscriminately.
Harlin's best tips for general maintenance:  
1. Use a brush with stiff bristles, a tooth brush can do the job.
2. If you use canned air allow time for the machine to dry before putting away.
3. Oil after 72 working hours, where metal rubs metal (consult your manual).


The tools you'll need:  a cleaning brush, screw driver, oil (if necessary for your machine) and a soft dry cloth.
Oiling is specific to each machine, so consult your manual or local professional.  I'll skip the oiling for this reason and focus on the cleaning.


We'll start with the Front Loader or Oscillating Bobbin machine, this is my Bernina 910, which I bought when I was 17 yrs old, she has been a loyal sewing companion for almost 30 years.

Remove the Throat Plate.  Most machines require the use of a screw driver.

Look at all that lint and gunk!


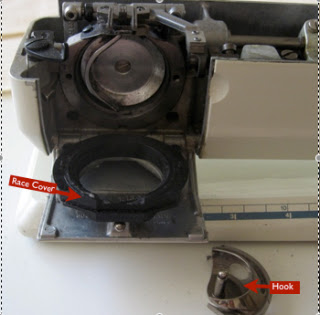
Remove the Race Cover.  The race cover in your machine may not be hinged to your machine, it may come out completely.
Remove the Bobbin Case.
Remove the Hook.


Brush out all the Lint and Gunk.  Use canned air if you like, but the brush is most affective. NEVER blow into the machine as your breath will leave behind moisture.  Remember to clean above the needle, too.


Drop In or Rotary Bobbin machine; a Janome Sewist 500.


Remove the Bobbin.  Not too bad in here.
Remove the Bobbin Case.


Whoa!  Look what was hiding under the bobbin case!


Super Clean!

Naturally, you'll need to put it all back together when finished; your trusty machine will love you for it!
I use a soft dry cloth to clean the outside of the machine, which gets as dirty as the insides.
Leave me some comments and let me know how your Machine Maintenance Adventure turns out.

Up next:  Creating your own Technique Notebook...